What Is Touch Typing and How Does It Work?
I used to think I was a reasonably fast typist because I could find most keys without much delay.
Then I paid attention to what my eyes were doing.
Every few words, I looked down at the keyboard. I searched for punctuation, checked the number row, and moved my hands whenever they drifted away from familiar keys. My typing felt quick during easy sentences but became slow and uneven as soon as the text became difficult.
That was the difference between knowing where many keys were and actually using touch typing.
So, what is touch typing?
Touch typing is a method of entering text without visually searching for each key. Instead of guiding every movement with your eyes, you use consistent finger positions and learned keyboard patterns to locate keys by touch.
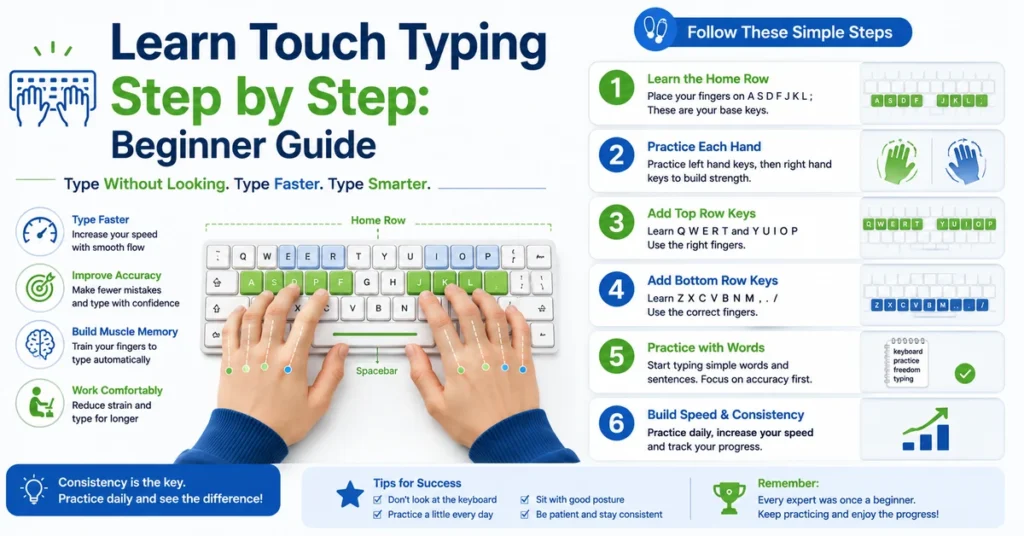
The traditional touch typing technique places eight fingers on the middle row of a QWERTY keyboard, known as the home row, with the thumbs near the space bar. Each finger is responsible for a particular group of keys.
With regular practice, those movements become increasingly automatic. You can keep your eyes on the screen, notice errors sooner, and focus more attention on the words you are typing.
What Is Touch Typing? Quick Definition
Touch typing is the ability to type without looking at the keyboard.
A touch typist normally:
- Keeps their eyes on the screen or source material
- Uses consistent fingers for particular keys
- Starts from a familiar hand position
- Locates keys through touch and repeated movement
- Minimizes unnecessary hand movement
- Develops a steady typing rhythm
- Notices mistakes while the text appears on the screen
The University of Wollongong describes touch typing as typing without looking at the keyboard and recommends returning the fingers to the home row to help locate keys through touch.
The traditional ten-finger system is the most widely taught touch typing method. However, research from Aalto University found that some fast self-taught typists used fewer fingers. Consistent finger-to-key mapping and limited whole-hand movement were more important than following one identical technique.
How Does Touch Typing Work?
Touch typing works by replacing visual searching with repeatable physical movements.
When you first learn a keyboard, you may use this process:
- Read a letter.
- Look down at the keyboard.
- Search for the key.
- Move a finger toward it.
- Press the key.
- Look back at the screen.
- Find your position in the text again.
That process requires frequent visual switching.
With touch typing, the process becomes simpler:
- Read the word or phrase.
- Use the assigned fingers to press the keys.
- Watch the text appear on the screen.
- Continue into the next word.
Your fingers gradually learn the distance and direction required to reach different keys.
You no longer think, “Where is the R key?” Instead, your left index finger performs a familiar upward movement from its starting position.
Aalto University’s research identified three characteristics associated with strong typing performance: consistent finger-to-key mapping, preparation for upcoming keystrokes, and minimal movement of the hands across the keyboard.
The Home Row: The Starting Point of Touch Typing
The home row is the middle letter row on a standard QWERTY keyboard.
The main home row keys are:
A S D F J K L ;
Place your hands like this:
Left hand
- Little finger on A
- Ring finger on S
- Middle finger on D
- Index finger on F
Right hand
- Index finger on J
- Middle finger on K
- Ring finger on L
- Little finger on the semicolon key
Keep your thumbs near the space bar.
Typing.com identifies A, S, D, F, J, K, L, and the semicolon as the home row keys. Its lessons use this row as the basic starting position for keyboard practice.
The home row is not a position where your fingers remain frozen.
Your fingers leave it to reach letters on the top and bottom rows. After pressing those keys, they return toward their normal positions so your hands do not lose their location.
This repeatable starting point is what makes typing without looking possible.
Why Are There Bumps on the F and J Keys?
Most physical keyboards have small raised lines or bumps on the F and J keys.
These marks help your index fingers find the home row without visual assistance.
Once your index fingers locate F and J:
- The left middle finger can settle on D.
- The left ring finger can settle on S.
- The left little finger can settle on A.
- The right middle finger can settle on K.
- The right ring finger can settle on L.
- The right little finger can settle on the semicolon.
Typing.com explains that the F and J bumps are designed to guide the fingers back to the home row.
Try this simple exercise:
- Remove your hands from the keyboard.
- Keep your eyes on the screen.
- Feel for the bumps on F and J.
- Place your index fingers on them.
- Set the other fingers on the home row.
- Repeat the exercise ten times.
This teaches you to reset your hand position without looking down.
Correct Finger Placement for Touch Typing
The traditional touch typing method assigns sections of the keyboard to different fingers.
| Finger | Main letter keys |
|---|---|
| Left little finger | Q, A, Z |
| Left ring finger | W, S, X |
| Left middle finger | E, D, C |
| Left index finger | R, F, V, T, G, B |
| Right index finger | Y, H, N, U, J, M |
| Right middle finger | I, K, comma |
| Right ring finger | O, L, period |
| Right little finger | P, semicolon, slash and nearby punctuation |
| Thumbs | Space bar |
The index fingers control more keys because they are positioned near the center of the keyboard and can move in both directions.
The little fingers often handle more specialized keys, including:
- Shift
- Tab
- Caps Lock
- Enter
- Backspace
- Punctuation
This finger map provides beginners with a clear system. Instead of deciding which finger to use during every word, they repeat one consistent movement.
However, hand size, keyboard design, physical comfort, and previous experience can lead people to make small adjustments.
Research does not show that every fast typist must use precisely the same ten-finger pattern. It does show that consistently using the same finger for a particular key and reducing large hand movements can support stronger performance.
How Keyboard Muscle Memory Develops
People often use the phrase keyboard muscle memory to describe automatic typing movements.
Your muscles do not literally store words. The phrase refers to a learned motor skill that becomes easier through repetition.
During early touch typing practice, you may consciously think:
- E is typed with my left middle finger.
- U is typed with my right index finger.
- M is typed with my right index finger.
- I should use the opposite Shift key for a capital letter.
That process is slow because every movement requires attention.
After enough correct repetition, common patterns begin to feel familiar:
- th
- ing
- tion
- er
- ou
- ight
Instead of processing the word “typing” as six unrelated letters, your fingers begin recognizing it as a familiar movement sequence.
Aalto’s analysis of typing behavior found that fast typists prepare upcoming keystrokes and use efficient movement strategies.
This is why accurate repetition matters.
If you repeatedly press a key with inconsistent fingers, you are practicing multiple competing movements. If you repeat the same movement accurately, it becomes easier to reproduce.
Touch Typing Does Not Mean Typing Fast Immediately
Touch typing describes a technique, not a particular WPM score.
A beginner using correct finger placement at 15 WPM is still practicing touch typing.
A self-taught typist reaching 60 WPM without looking at the keyboard may also be using a personalized form of touch typing, even if their finger placement differs from the traditional method.
Speed develops after the movements become familiar.
When someone changes from hunt-and-peck typing to touch typing, their WPM often decreases temporarily. Their old technique is automatic, while the new technique requires conscious attention.
For example:
| Stage | Possible experience |
|---|---|
| Old hunt-and-peck method | 38 WPM with frequent keyboard glances |
| First touch typing sessions | 15–20 WPM |
| Developing key familiarity | 25–30 WPM |
| More automatic movement | 35–45 WPM |
| Continued practice | Higher sustainable speed |
These figures are examples, not guaranteed timelines.
The important point is that a temporary slowdown does not mean touch typing has failed. You are rebuilding the way your hands interact with the keyboard.
What Are the Benefits of Touch Typing?
The benefits of touch typing become most noticeable during longer tasks.
1. You Can Keep Your Eyes on the Screen
Typing without looking at the keyboard allows you to watch the words as they appear.
This makes it easier to notice:
- Misspelled words
- Missing spaces
- Repeated letters
- Punctuation errors
- Missing words
- Incorrect capitalization
Instead of discovering several mistakes at the end of a paragraph, you may notice them immediately.
2. Touch Typing Can Support Faster Typing
A consistent finger system reduces the time spent visually searching for keys.
It can also reduce unnecessary hand travel.
Aalto researchers observed that fast typists tended to use consistent finger mappings and keep their hands in relatively stable positions.
Touch typing does not guarantee that everyone will reach the same speed. It removes common sources of hesitation that can limit speed.
3. It Can Improve Typing Rhythm
Hunt-and-peck typing often follows a start-and-stop pattern:
- Find a key
- Type a short group of letters
- Look down again
- Pause at punctuation
- Search for the next key
Touch typing supports a smoother sequence because the fingers already know their general working areas.
A steady rhythm can make typing feel calmer, even before your WPM increases.
4. It Frees Attention for the Content
When you do not need to search for keys, you can devote more attention to:
- Organizing ideas
- Following the source text
- Choosing words
- Checking grammar
- Listening during a meeting
- Understanding an assignment
- Responding to a customer
Your keyboard becomes less of an interruption between your thoughts and the screen.
5. It Can Make Longer Tasks More Comfortable
Touch typing distributes work across several fingers instead of relying mainly on one or two.
That does not make every touch typing posture automatically ergonomic. Your chair, desk, keyboard height, wrist position, and practice duration still matter.
OSHA recommends positioning the keyboard so the wrists can remain neutral and arranging the workstation to avoid awkward reaches.
Touch Typing vs Hunt-and-Peck Typing
Hunt-and-peck typing means visually searching for keys and pressing them with one or a small number of fingers.
The name comes from the movement of looking for a key and then pressing it.
| Touch typing | Hunt-and-peck typing |
|---|---|
| Eyes remain mostly on the screen | Eyes repeatedly move to the keyboard |
| Fingers use consistent key areas | Finger choice may change frequently |
| Uses learned key positions | Relies heavily on visual searching |
| Supports smoother word transitions | Often creates pauses between keys |
| Requires an initial learning period | Feels easier immediately |
| Can use several fingers efficiently | Often depends on one or two fingers |
| Errors are visible sooner | Errors may be noticed later |
Hunt-and-peck typing is not automatically useless.
Some people develop reasonable speed with a personalized method. Aalto University found that certain self-taught typists performed well without using a strict ten-finger system.
The main limitations appear when the method requires constant keyboard glances, inconsistent finger use, or large hand movements.
Is Touch Typing Always a Ten-Finger Method?
The traditional answer is yes: touch typing lessons normally teach eight fingers across the home row and use the thumbs for the space bar.
In everyday usage, however, the term is also commonly used more broadly for typing without looking at the keyboard.
Research shows that fast typists can use different finger strategies. Some use all ten fingers, while others develop efficient systems using fewer fingers.
For beginners, learning the traditional system still has clear practical value:
- Every key has an assigned finger.
- Hand positioning is easier to understand.
- Exercises follow a logical order.
- The workload is distributed across both hands.
- The learner has a repeatable method.
After building a reliable foundation, a typist may naturally adjust certain reaches.
Consistency is more important than changing fingers randomly within the same key or word.
How to Begin Learning Touch Typing
Touch typing for beginners should be learned in stages.
Trying to master every letter, number, symbol, and punctuation mark during the first session creates unnecessary frustration.
Step 1: Learn the Home Row
Begin with:
A S D F J K L ;
Practice simple combinations:
asdf jkl;
sad fall ask dad
lad flask salad
Focus on the correct finger rather than your WPM.
Step 2: Add the Top Row
The top letter row is:
Q W E R T Y U I O P
Practice words such as:
type
write
quiet
power
your
true
After each reach, return your fingers toward the home row.
Step 3: Add the Bottom Row
The bottom letter row is:
Z X C V B N M , . /
Practice:
name
move
zoom
maximum
mix
can
The bottom row may feel awkward because the fingers move downward from their starting position.
Step 4: Practice Without Looking
Keep your eyes on the screen.
Use the F and J bumps whenever your hands lose position.
Begin with easy words. Cover your hands with a light cloth when the temptation to look down is difficult to resist.
Step 5: Add Capitals and Punctuation
Once letters feel familiar, add:
- Shift keys
- Commas
- Periods
- Apostrophes
- Question marks
- Quotation marks
Use the Shift key on the opposite side from the hand typing the capital letter.
Step 6: Add Numbers and Symbols
The number row is farther from the home position and often takes longer to learn.
Practice dates, prices, percentages, phone numbers, and email addresses rather than typing isolated numbers only.
Step 7: Measure Speed and Accuracy
Use the free typing speed test to establish a baseline.
The tool provides different test durations and content modes, including common text, quotations, code, numbers, punctuation, capitals, and custom text. It reports WPM, accuracy, errors, consistency, keyboard activity, and an error heat map.
Take three tests and calculate an average instead of keeping only your highest result.
A Simple 15-Minute Touch Typing Practice Routine
Use this routine on most practice days.
Minutes 1–3: Home-row warm-up
Type simple home-row words and short sentences.
Concentrate on finger position.
Minutes 4–6: New-key practice
Work on one small group of top- or bottom-row keys.
Do not add the entire keyboard in one session.
Minutes 7–9: No-looking practice
Cover your hands and type an easy paragraph.
Accept a temporary decrease in speed.
Minutes 10–12: Accuracy practice
Type at a controlled pace and aim to reduce repeated mistakes.
Minutes 13–14: Natural text
Type a realistic paragraph containing capitals and punctuation.
Minute 15: Timed test
Take one one-minute test and record:
- WPM
- Accuracy
- Errors
- Weak keys
- Keyboard glances
Avoid taking the test repeatedly until you receive a preferred number.
One honest result helps you plan the next session.
Touch Typing Mistakes Beginners Commonly Make
Trying to Type at Full Speed
Your old method has more practice than your new technique.
Slow down while learning correct movements.
Looking Down After Every Error
Use the F and J bumps to reset your hands.
A keyboard glance may solve one mistake but reinforce the habit you are trying to break.
Learning Too Many Keys at Once
Practice one row or small key group before adding more.
Using Inconsistent Fingers
Pressing the same key with different fingers creates competing movements.
Choose one repeatable method.
Practicing Only Random Letters
Letter combinations are useful at the beginning, but real words and sentences help the movement become practical.
Ignoring Accuracy
Fast, incorrect repetitions teach unreliable movements.
Build accuracy before pushing for maximum speed.
Practicing Only Easy Lowercase Words
Real typing includes capitals, punctuation, numbers, names, and symbols.
Add them gradually.
Taking Test After Test
A typing test measures performance. Targeted exercises improve particular weaknesses.
Practicing While Tense
Raised shoulders, bent wrists, and heavy keystrokes can make longer sessions uncomfortable.
Touch Typing and Proper Keyboard Posture
A good typing technique should be combined with a comfortable workstation.
OSHA advises users to position the keyboard with other workstation components in mind and adjust the setup to support a neutral wrist posture.
Use these practical guidelines:
- Place the keyboard directly in front of you.
- Keep your shoulders relaxed.
- Keep your elbows near your body.
- Keep the wrists aligned with the forearms.
- Avoid reaching forward for the keyboard.
- Keep the mouse close.
- Press keys lightly.
- Support your feet.
- Position the screen where it is easy to read.
- Take breaks during long typing sessions.
Do not assume that raising the rear keyboard feet is always better. The correct angle depends on the keyboard’s height and your workstation position. Choose the setup that keeps your wrists close to neutral.
Persistent pain, numbness, tingling, or weakness should not be treated as a normal part of touch typing practice.
How Long Does It Take to Learn Touch Typing?
There is no universal timeline.
Your progress depends on:
- Your current typing method
- Daily practice time
- Keyboard familiarity
- Accuracy
- Language familiarity
- Whether you use the new technique outside practice
- How often you look at the keyboard
- Whether you practice consistently
A learner may understand the finger map within a few sessions but need several weeks or months before typing without looking feels natural.
The difficult stage often occurs when the new technique is slower than the old method.
A person may practice proper touch typing for 15 minutes and then return to hunt-and-peck typing for several hours. In that situation, the old method continues receiving more repetition.
Use the new technique during low-pressure tasks:
- Search queries
- Personal notes
- Short messages
- Simple emails
- To-do lists
Gradually introduce it into longer assignments and work.
Does Touch Typing Improve WPM?
Touch typing can help improve WPM by reducing keyboard searches, inconsistent movements, and large hand travel.
However, touch typing alone does not guarantee a particular speed.
Your WPM is also affected by:
- Reading speed
- Familiarity with the language
- Accuracy
- Typing rhythm
- Practice history
- Test duration
- Passage difficulty
- Punctuation
- Keyboard familiarity
Aalto’s research suggests that consistent finger mapping, preparation of upcoming keys, and minimal global hand movement are important predictors of typing performance.
Touch typing provides a system for developing those qualities, but improvement still requires deliberate practice.
How to Measure Touch Typing Progress
Do not measure only your highest WPM.
Track:
| Skill | What to record |
|---|---|
| Speed | One-minute and five-minute WPM |
| Accuracy | Percentage typed correctly |
| Errors | Repeated keys and error types |
| Keyboard glances | How often you look down |
| Consistency | Whether your pace remains steady |
| Endurance | Whether speed drops on longer tests |
| Comfort | Tension in fingers, wrists, or shoulders |
A progress table may look like this:
| Week | WPM | Accuracy | Keyboard glances |
|---|---|---|---|
| Week 1 | 19 | 90% | Frequent |
| Week 2 | 24 | 94% | About 10 per test |
| Week 3 | 29 | 96% | About 4 per test |
| Week 4 | 34 | 97% | Rare |
The learner’s improvement is not limited to WPM.
Reduced keyboard glances and higher accuracy show that the touch typing method is becoming more automatic.
Frequently Asked Questions
What is touch typing?
Touch typing is a method of typing without visually searching for individual keys. The typist uses consistent finger movements and learned key positions to enter text.
How does touch typing work?
Touch typing works by assigning fingers to specific keyboard areas and repeating those movements until key locations become familiar. The typist can then keep their eyes on the screen.
Is touch typing the same as typing without looking?
Typing without looking is the central feature of touch typing. The traditional method also uses a home-row position and assigned finger zones.
What are the home row keys?
The main home row keys are A, S, D, F for the left hand and J, K, L, semicolon for the right hand.
Why are F and J keys marked?
The raised marks on F and J help the index fingers find the home row without looking at the keyboard.
Do I need all ten fingers for touch typing?
Traditional touch typing uses eight fingers for letter keys and the thumbs for the space bar. Research shows that some fast typists use fewer fingers, but consistent finger movements remain important.
Is touch typing better than hunt-and-peck?
Touch typing usually makes it easier to keep your eyes on the screen and use consistent movements. Hunt-and-peck typing relies more heavily on visual key searching.
Does touch typing make you type faster?
It can support faster typing by reducing hesitation and unnecessary movement. Actual WPM improvement depends on practice, accuracy, language familiarity, and other factors.
Is touch typing difficult to learn?
The finger map is straightforward, but making the movements automatic requires regular practice. A temporary decrease in speed is common.
How often should beginners practice touch typing?
Ten to twenty focused minutes on most days is a practical starting routine. Stop before fatigue causes poor technique.
Should I focus on accuracy or speed first?
Focus on correct, repeatable movements and reasonable accuracy first. Increase speed gradually after the technique becomes stable.
Can adults learn touch typing?
Yes. Touch typing is a learnable motor skill, and adults can improve their finger consistency, keyboard familiarity, accuracy, and speed through practice.
Final Thoughts
So, what is touch typing?
It is more than placing your fingers on ASDF and JKL.
Touch typing is a system that allows your fingers to locate keys without waiting for your eyes. The home row provides a reference point, the F and J bumps help you reset your hands, and consistent finger movements gradually make common words feel automatic.
You may type more slowly when you first switch techniques.
That slowdown is expected. Your old method has had more practice, while the new movements still require conscious thought.
Begin with the home row. Add a few keys at a time. Keep your eyes on the screen, practice accurately, and use the same finger mappings during everyday typing.
Over time, the keyboard stops feeling like a collection of separate letters.
It becomes a familiar movement pattern between your thoughts and the screen.
External Resources and References
The touch typing definition and home-row guidance in this article were checked against the University of Wollongong’s touch-typing resource and Typing.com’s home-row lessons. Research into efficient finger strategies comes from Aalto University’s How We Type study and its summary explaining why ten fingers are not always required for fast typing. Workstation guidance is based on OSHA’s official keyboard ergonomics recommendations.