
Learn Touch Typing Step by Step
Learn how to type correctly using all ten fingers without repeatedly looking at the keyboard. This tutorial explains home-row placement, finger-control zones, typing posture, and a simple practice method.
After learning the basics, use our online typing speed test to measure your WPM, accuracy, and errors.
What Is Touch Typing?
Touch typing is a method of typing in which each finger controls a specific group of keyboard keys. Your fingers begin from a fixed position called the home row and return to that position after reaching other keys.
The purpose is to type while keeping your attention on the screen instead of searching for every key.
Touch typing can help you:
- Use both hands efficiently
- Reduce unnecessary finger movement
- Type with better control
- Make fewer typing mistakes
- Develop a consistent typing rhythm
- Focus on the text displayed on the screen
Place Your Fingers on the Home Row
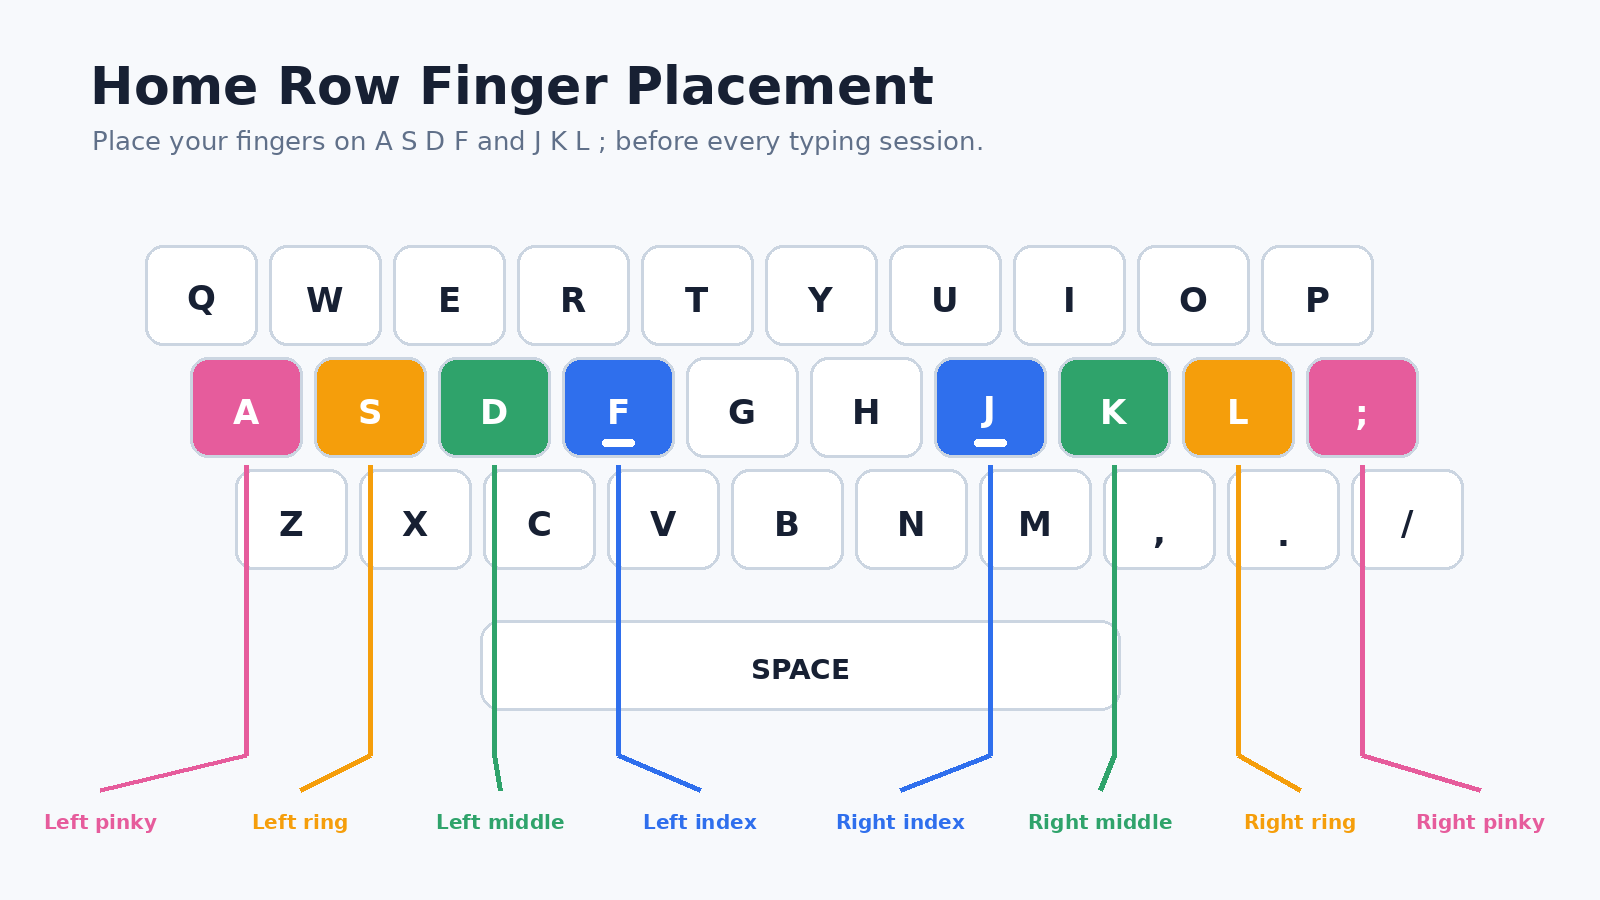
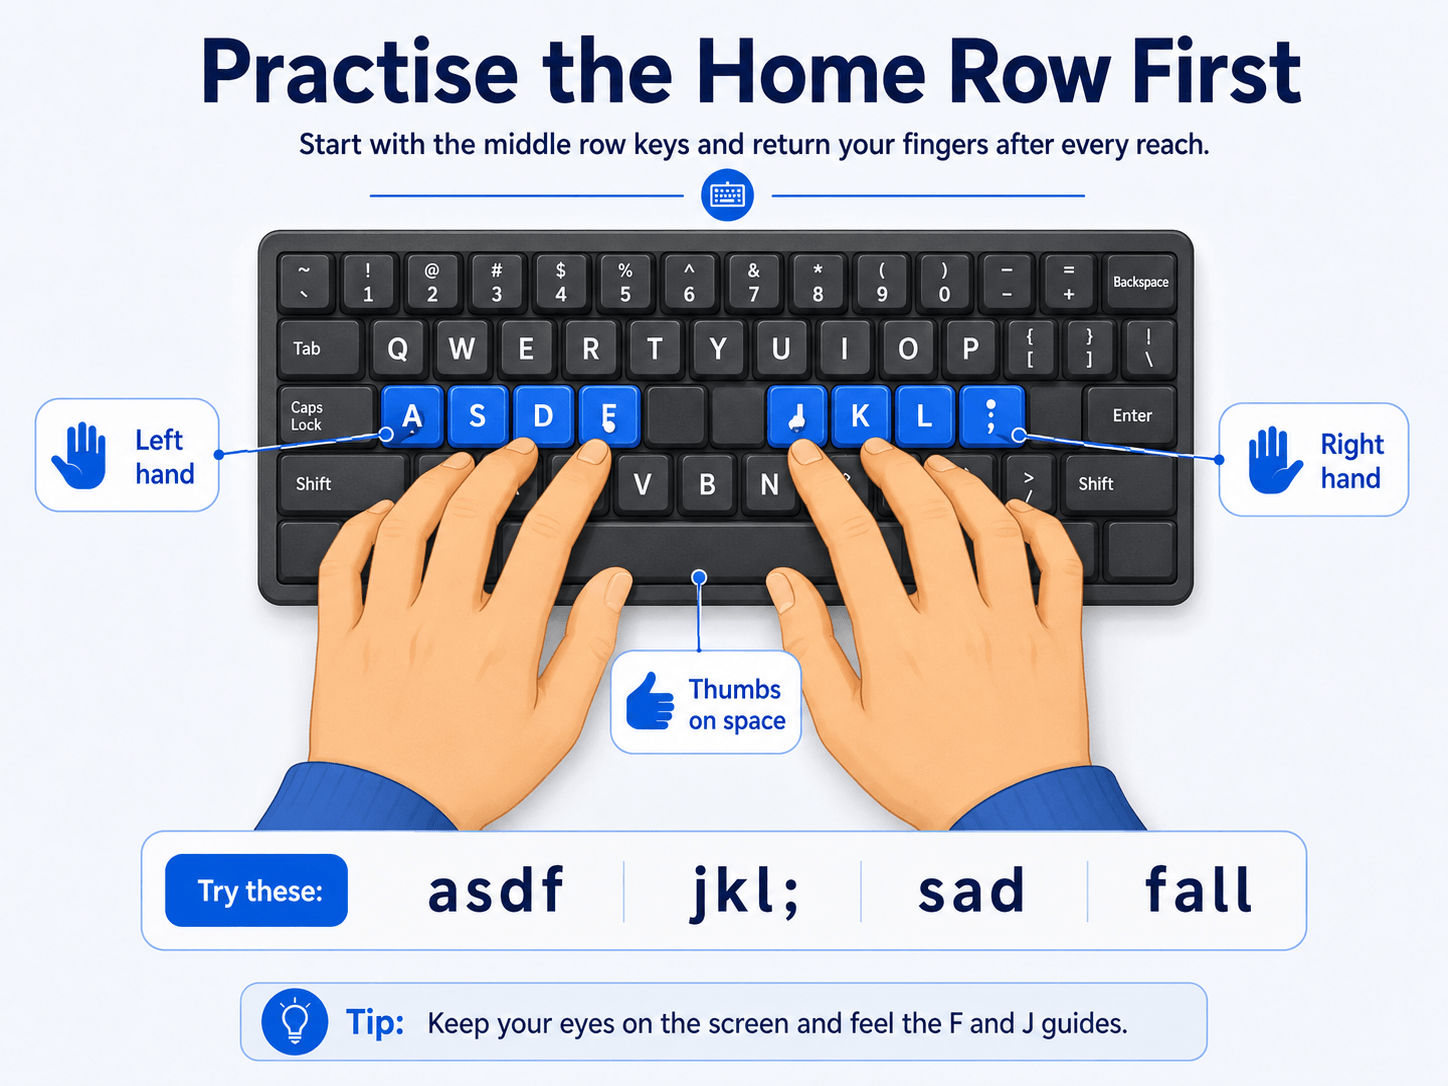
The home row is the middle row of letter keys on a standard QWERTY keyboard.
Place your fingers as follows:
Left hand
- Left pinky on A
- Left ring finger on S
- Left middle finger on D
- Left index finger on F
Right hand
- Right index finger on J
- Right middle finger on K
- Right ring finger on L
- Right pinky on ;
Place either thumb lightly over the Space bar.
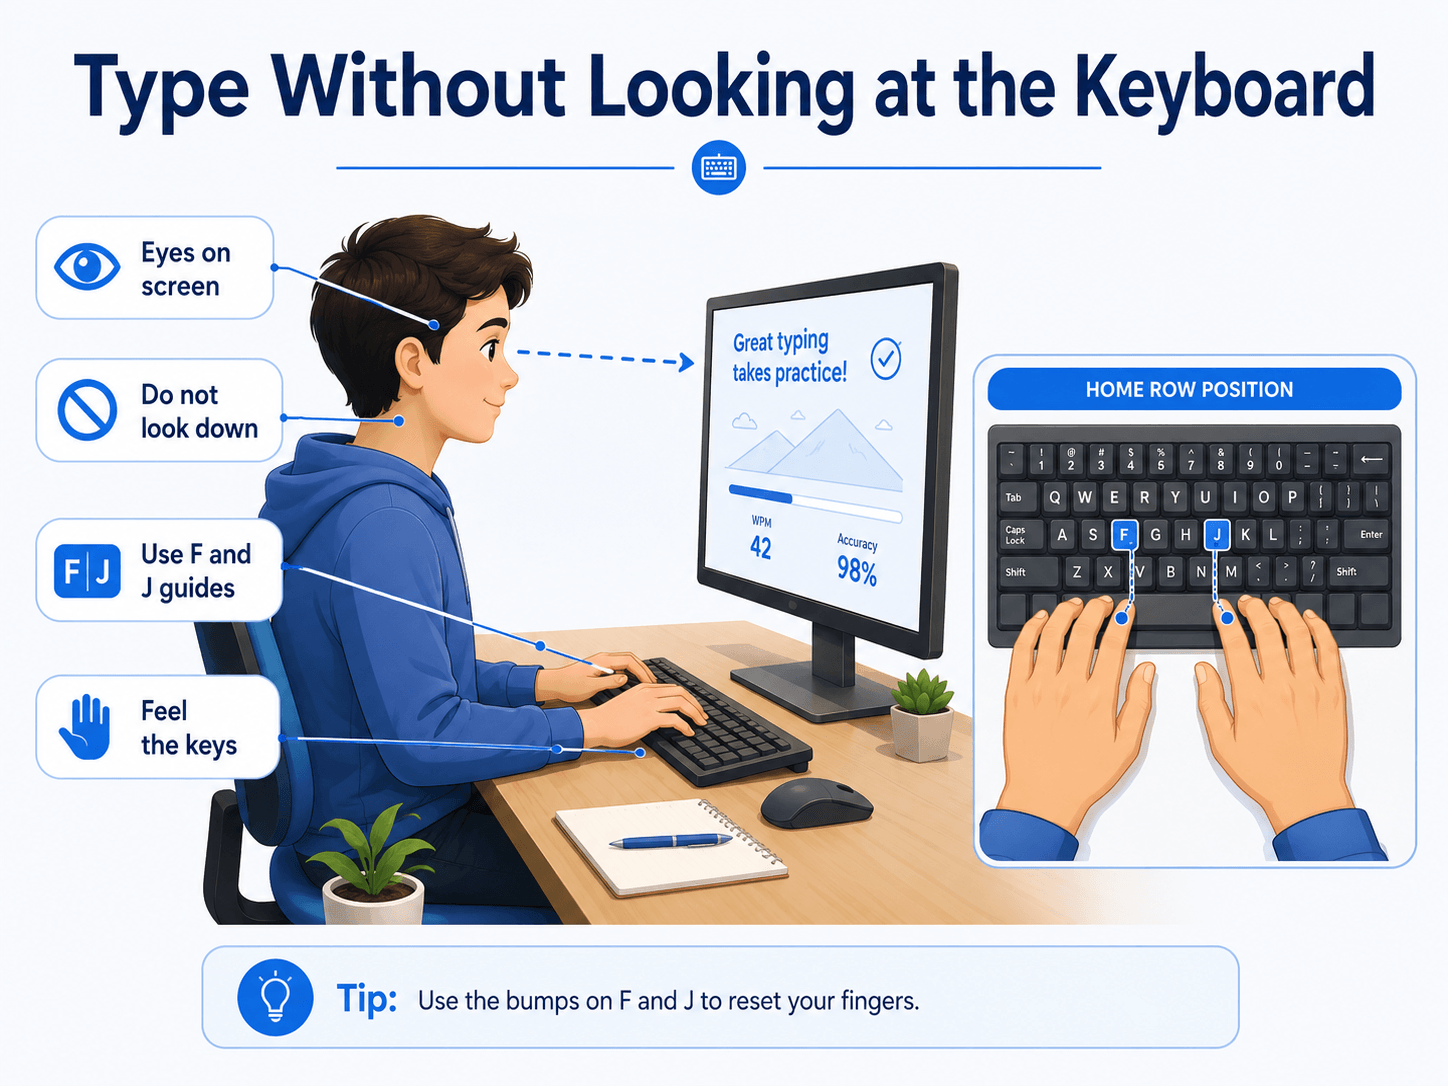
The F and J keys normally have small raised marks. You can feel these marks with your index fingers to find the home row without looking down.
After pressing another key, move the finger back toward its home-row position. This gives your hands a consistent starting point for the next keystroke.
Learn Which Finger Controls Each Key
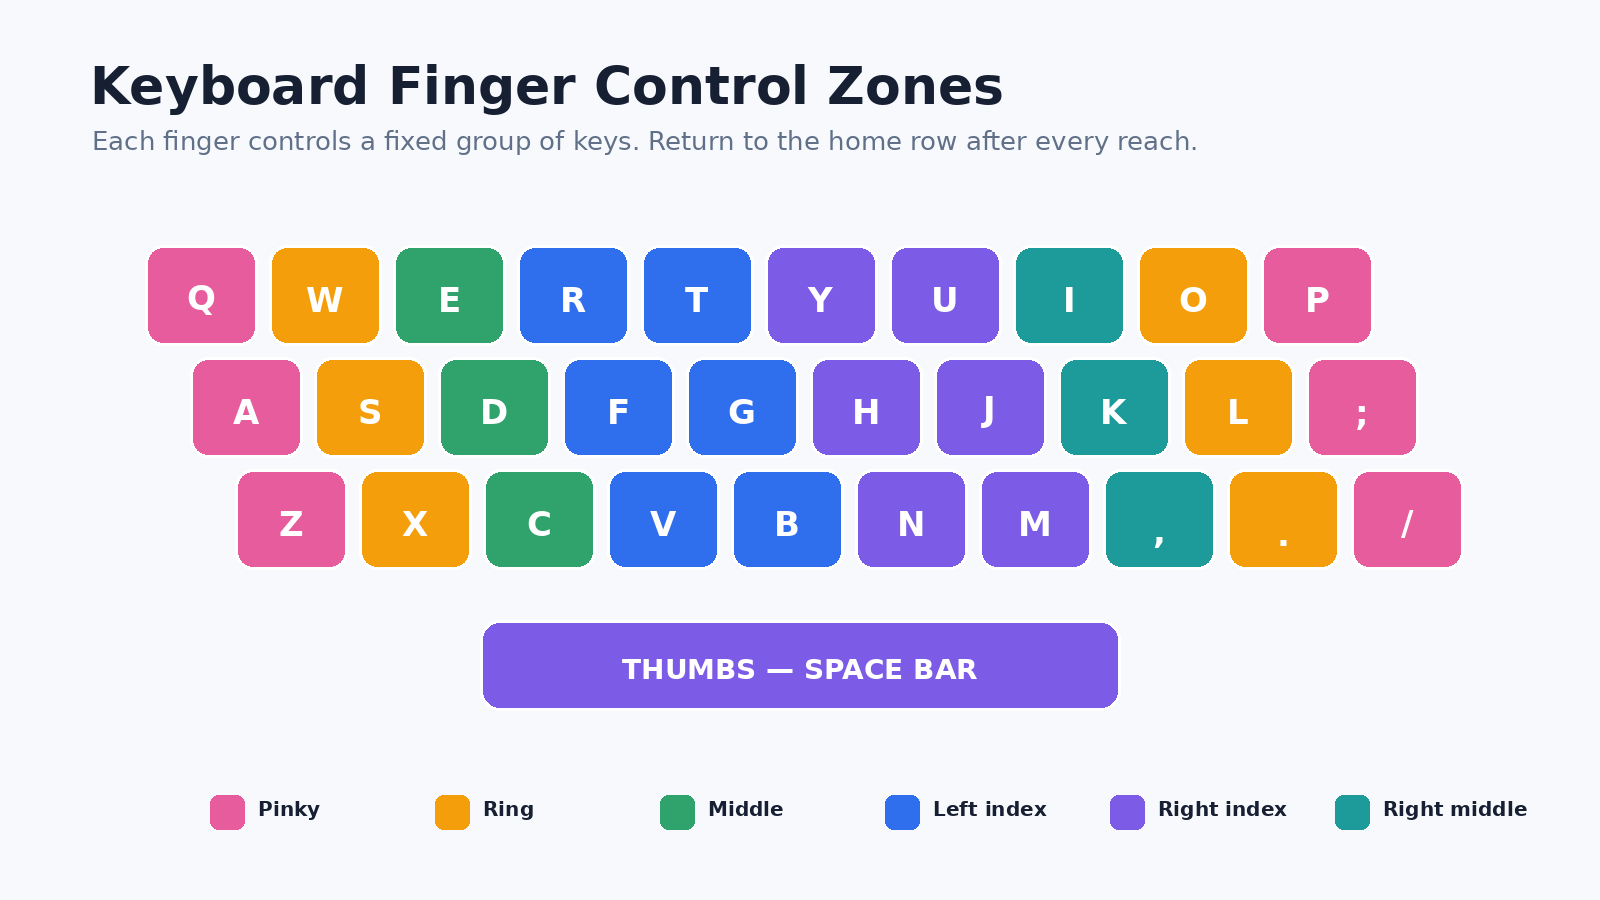
Every finger is responsible for a specific keyboard zone. Avoid moving one finger across the entire keyboard.
Left pinky
Controls:
- Q / A / Z / Left Shift / Tab / Caps Lock
Left ring finger
Controls:
- W / S / X
Left middle finger
Controls:
- E / D / C
Left index finger
Controls:
- R / F / V / T / G / B
Right index finger
Controls:
- Y / H / N / U / J / M
Right middle finger
Controls:
- I / K / Comma
Right ring finger
Controls:
- O / L / Period
Right pinky
Controls:
- P / Semicolon / Forward slash / Enter / Backspace / Right Shift
Thumbs
Use a thumb to press the Space bar.
You may feel slower when first practising fixed finger zones. Do not return to typing with only two or three fingers. Give your hands time to learn the correct movements.
Use Shift, Space, and Backspace Correctly
Letter keys are not the only important part of touch typing. You must also learn how to use Shift, Space, and Backspace without losing your hand position.
Using the Shift keys
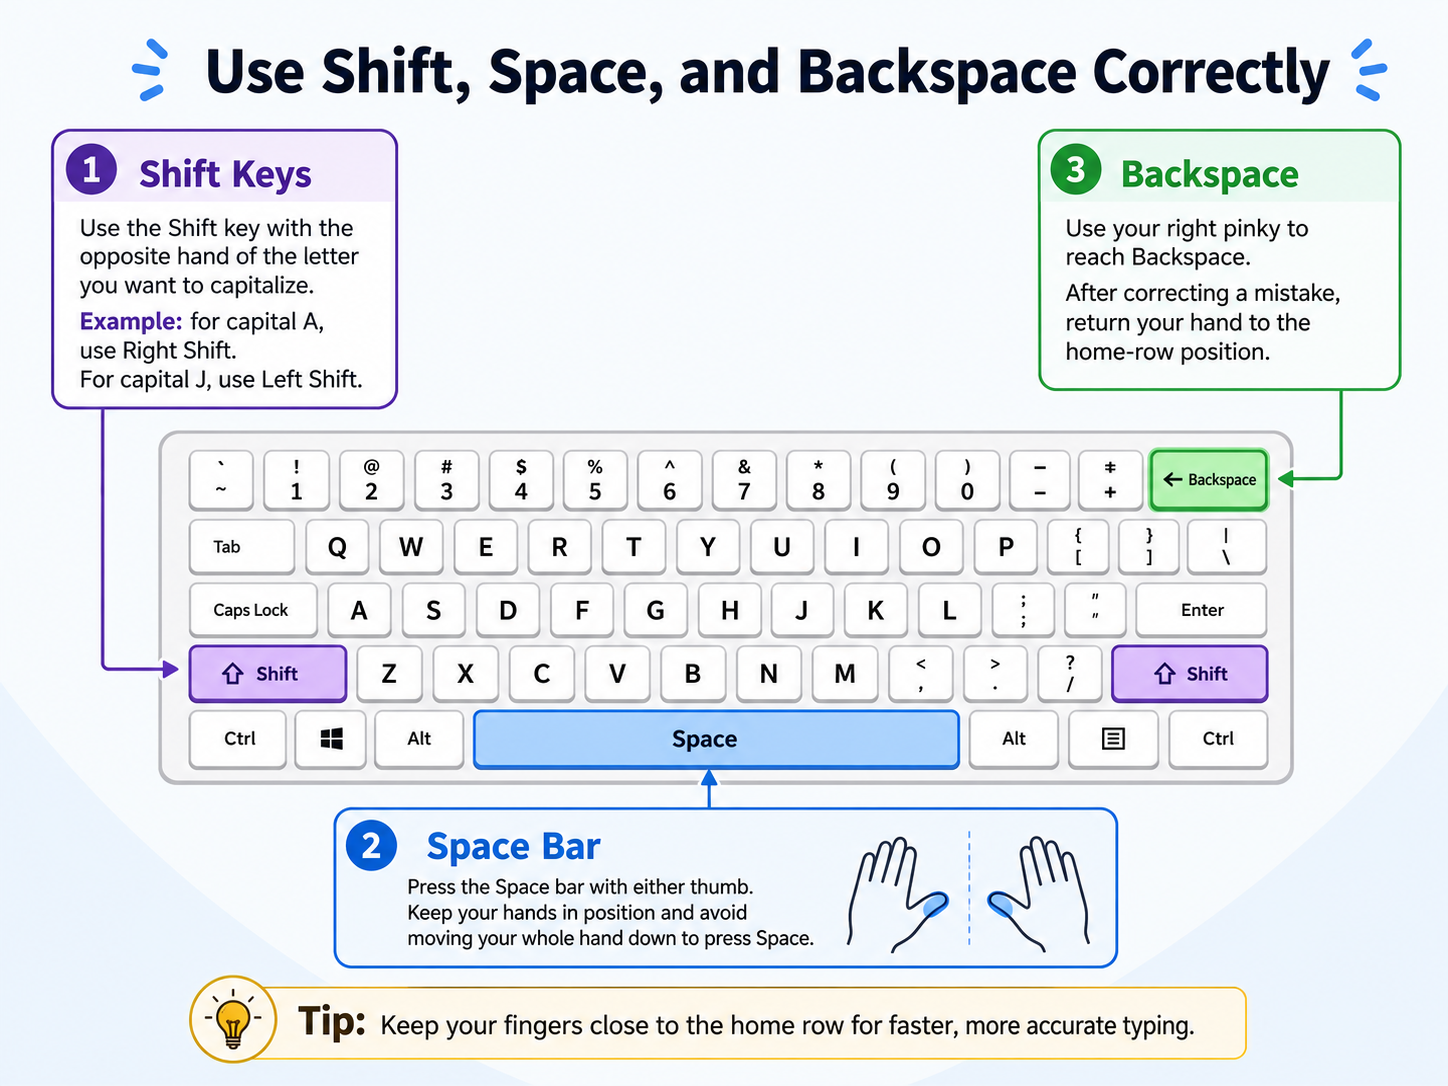
Use the Shift key with the hand opposite the letter being capitalized.
For example:
- For capital A, press the right Shift key.
- For capital J, press the left Shift key.
This allows the finger responsible for the letter to remain available.
Using the Space bar
Press the Space bar with either thumb. Choose the thumb that feels more natural and use it consistently.
Avoid moving your whole hand downward to press Space.
Using Backspace
Use your right pinky to reach Backspace. After correcting the mistake, return the finger toward the semicolon key.
During practice, correct mistakes instead of ignoring them. This helps prevent incorrect movements from becoming habits.
Maintain a Comfortable Typing Position
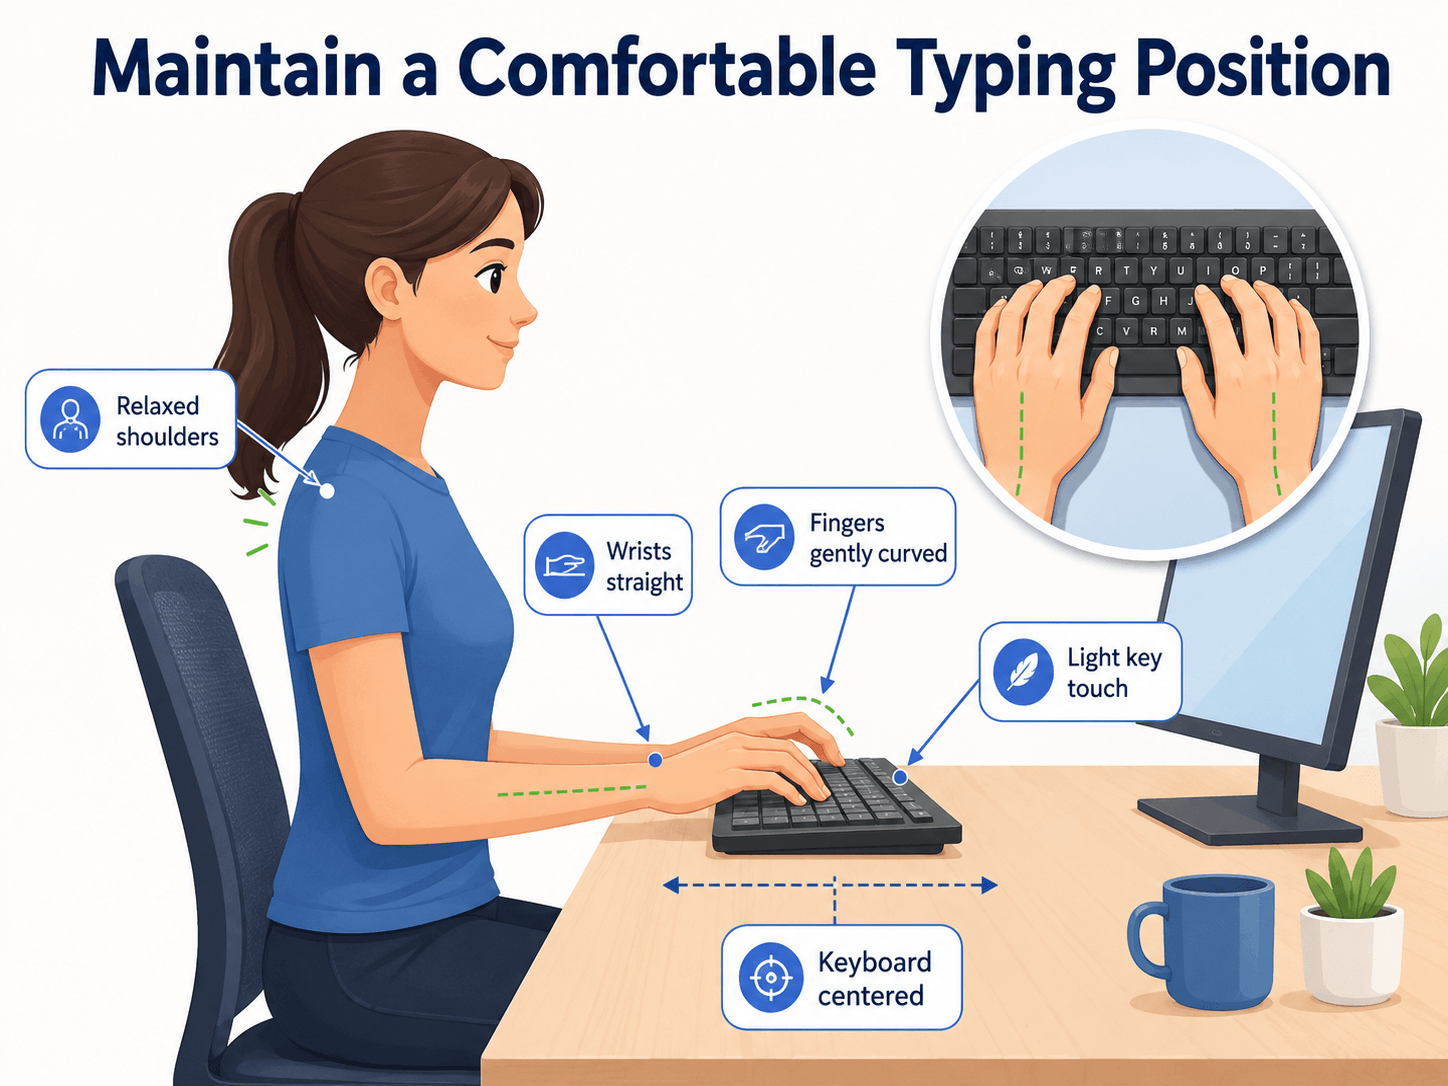
Correct posture helps you maintain control during longer typing sessions.
Use the following setup:
- Sit with your back supported.
- Keep your head facing forward.
- Relax your shoulders.
- Keep your elbows close to your body.
- Position the keyboard directly in front of you.
- Keep your wrists straight and in line with your forearms.
- Keep both feet supported by the floor or a footrest.
- Place the monitor at a comfortable viewing height.
- Keep your fingers slightly curved over the keys.
Do not press your wrists heavily against the desk while actively typing. Adjust your chair, desk, and keyboard so your arms and wrists remain in a comfortable, neutral position.
Type Without Looking at the Keyboard
Looking at the keyboard interrupts your rhythm and prevents you from learning key positions.
Keep your attention on the text displayed on the screen. Use the raised marks on the F and J keys whenever you need to reset your hand position.
At first, you may:
- Press the wrong key
- Type more slowly
- Forget which finger controls a letter
- Feel tempted to look down
These difficulties are normal during early practice. Slow down and continue using the correct fingers.
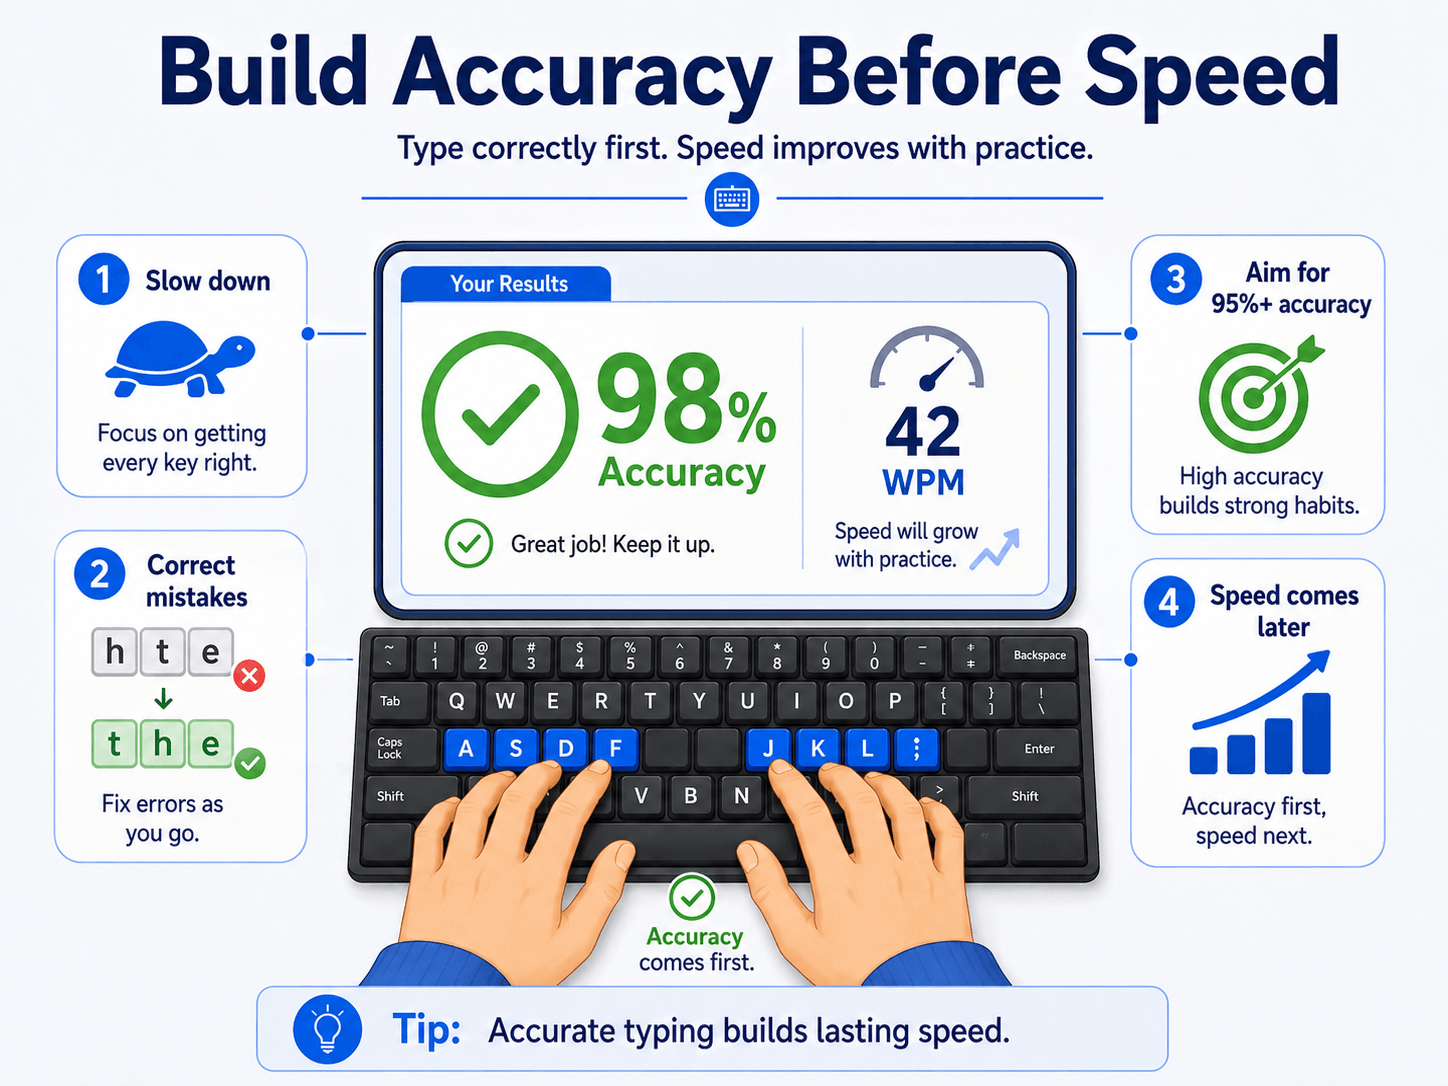
Accuracy is more important than speed while learning.
Practise the Home Row First
Begin with letters that can be typed without moving away from the home row.
Practise combinations such as:
- asdf
- jkl;
- sad
- fall
- ask
- flask
- salad
- hall
- dad
- lad
Do not rush. Concentrate on pressing each key with the correct finger.
Once you can type home-row combinations comfortably, add upper-row and lower-row letters gradually.
Build Accuracy Before Speed
Typing quickly is not useful when the text contains frequent mistakes.
During early practice:
- Type at a comfortable pace.
- Use the correct finger for every key.
- Correct mistakes when they happen.
- Aim for consistent movement.
- Avoid hitting keys with unnecessary force.
- Restart when your hand position becomes confused.
Use your typing accuracy as the first measurement of improvement. Once your accuracy becomes stable, gradually increase your pace.
A Simple 10-Minute Typing Practice Routine
Use this short routine each day.
Minutes 1–2: Home-row warm-up
Type simple home-row combinations while checking your finger placement.
Minutes 3–5: Key-zone practice
Practise words containing letters that require your fingers to move above and below the home row.
Minutes 6–8: Sentence practice
Type complete sentences containing capital letters, spaces, and punctuation.
Minutes 9–10: Typing speed test
Complete a one-minute typing test and review: WPM, Accuracy, Incorrect words, Incorrect characters, Most difficult keys Use the result to decide what to practise during your next session.
How to Use the Typing Speed Test for Practice
Our online typing test can help you measure progress after learning the correct technique.
Choose a test duration
Use:
- 15 or 30 seconds for a quick warm-up
- 1 minute for regular progress checks
- 3 or 5 minutes for sustained typing practice
Common Touch-Typing Mistakes
Using only index fingers
Typing with one or two fingers creates unnecessary hand movement and makes it difficult to develop consistent key control.
Looking down after every word
Use the F and J key markers to reset your hands instead of visually searching for the keys.
Moving the entire hand
Move the finger responsible for the key rather than shifting your whole hand across the keyboard.
Ignoring typing errors
Repeated incorrect movements can become habits. Slow down and correct your technique.
Chasing WPM too early
Speed should increase after your finger placement and accuracy become more reliable.
Practising for too long
Short, focused sessions are easier to repeat consistently than occasional exhausting sessions.
Start Practising Your Typing
Place your fingers on the home row, select a test duration, and begin typing. Review your accuracy and errors after every test, then practise the keys that caused the most difficulty.
